


Introduction
Kubernetes CronJob makes it very easy to run Jobs on a time-based schedule. These automated jobs run like Cron tasks on a Linux or UNIX system.
In this post, we will use Kubernetes CronJob to schedule a recurring backup of the MongoDB database and upload the backup archive to AWS S3.
There are several ways of achieving this, but then again, I had to stick to one using Kubernetes since I already have a Kubernetes cluster running.
Prerequisites:
- Docker installed on your machine
- Container repository (Docker Hub, Google Container Registry, etc) – I’ve used Docker hub
- Kubernetes cluster running
Steps to achieve this:
- MongoDB installed on the server and running or MongoDB Atlas – I’ve used Atlas
- AWS CLI installed in a docker container
- A bash script will be run on the server to backup the database
- AWS S3 Bucket configured
- Build and deploy on Kubernetes
MongoDB Setup:
You can set up a Mongo database on your server or use a MongoDB Atlas cluster instead. The Atlas cluster is a great way to set up a Mongo database and is free for M0 clusters. You can also use a Mongo database on your server or on a Kubernetes cluster.
After creating your MongoDB instance, we will need the Connection String. Please keep it safe somewhere as we will need it later.
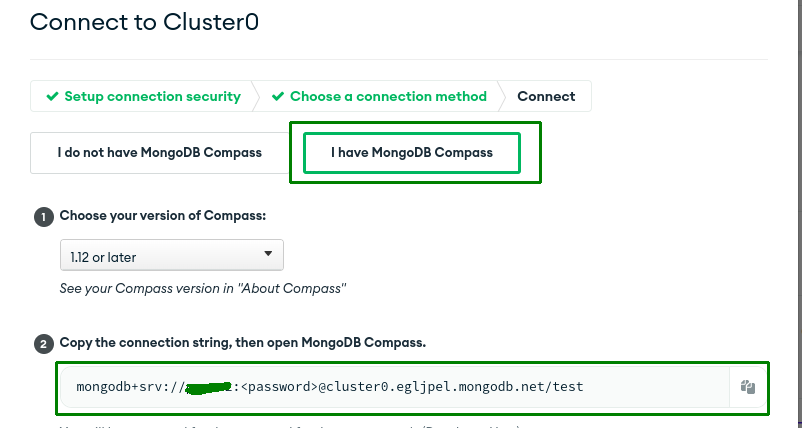
Choosing a connection string may confuse which one to pick. So we need to select the MongoDB Compass one that looks in the below format.
mongodb+srv://user:<password>@<hostname>/<db_name>
AWS CLI & Mongo Tools Setup in a Docker Container:
This is a crucial step as we will be use this container to run our scheduled backups to S3 using Kubernetes cron jobs.
We need to create a Dockerfile with the below contents.
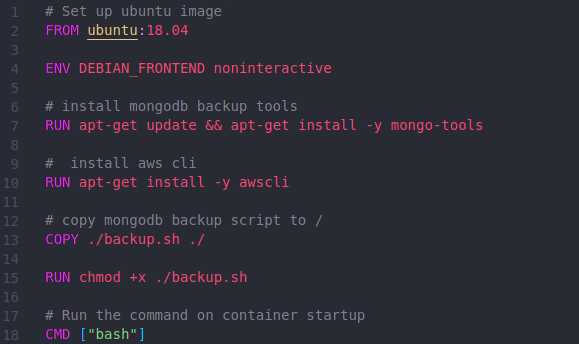
The above file is self-explanatory, but let me explain all the steps.
Step 1/7:
- Pull the Ubuntu 18.04 image. This will be the base image for our container.
Step 2/7:
- Set the DEBIAN_FRONTEND environment variable to non-interactive.
Step 3/7:
- Install MongoDB backup tools. This will enable us to back up the Mongo database using commands like mongo-dump.
Step 4/7:
- This will enable us to use aws cli to interact with AWS services.
Step 5/7:
- Copy the MongoDB backup script to the root directory in the container – (We will create the shell script in the next step)
Step 6/7:
- We will need to change the permissions of the script to make it executable by running the following:
chmod +x backup.sh
Step 7/7:
- Run the command on container startup using CMD:-
bash script
Create a file backup. sh and put the below content. This is the main file for the entire process.
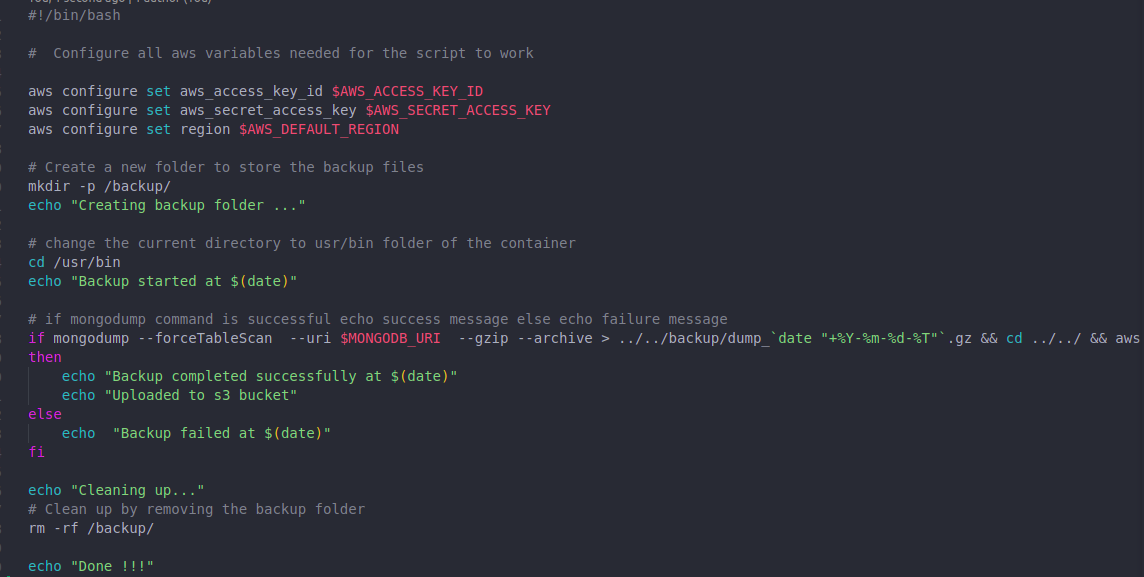
The above file is doing AWS S3 configuration, mongo dump & storing the dump to an S3 bucket.
The ‘$’ sign in front of some uppercase words are environment variables we will pass to the container later at execution time.
To facilitate the process of reading logs and debugging the script, I have included echoing messages that indicate the current step in the execution flow. These messages provide clarity and assist in tracking the progress of the script.
AWS S3 Bucket Setup
You must log in to your AWS account, search for the S3 bucket service and create a new bucket. You can read more about this here: AWS S3 setup
Kubernetes Secrets
Kubernetes Secrets allows us to store and manage sensitive information. Keeping confidential information a Secret is safer and more flexible than putting it verbatim in a Pod definition or in a container image.
We will use the .env file to create secrets in our Kubernetes cluster that will then be used to pass the variables to the container at execution time.
Note: For simplicity, you can create a .env file (e.g backup.env) in the root folder of the project and add the following variables to it.
S3_BUCKET=<your_S3_bucket_name>
MONGODB_URI=<your_mongo_connection_string>
AWS_ACCESS_KEY_ID=<your_aws_access_key>
AWS_SECRET_ACCESS_KEY=<your_aws_secret_key>
AWS_DEFAULT_REGION=<aws_s3_region>
Build and Deploy
So this is the final part of this process. We will build the container and deploy it to our Kubernetes cluster.
If you are not familiar with Kubernetes, you can read more about it here: Kubernetes Basics
Ensure you have the correct folder structure. Mine looks like this:

Ensure you are in the root folder of the project (db_backup).
Then run this to build the container:
docker build .-t repository_name/container_naem:tag_name
Where “you_repository” is the repository name, “cronjob-server” is the container name, and “latest” is the tag name.
The same naming convention is followed in the commands below as well.
You can run the container locally using the following command to pass secrets from the env file and run the container:
docker run -it --env-file backup.env <your_repository>/cronjob-server:latest /bin/bashYou can push to your docker or image repository by running the following command:
docker push repository_name/container_name:tag_name
To run the bash script as a cron job we need to create a .yaml file.
Create a file with the name cronjob.yaml and put the below content.
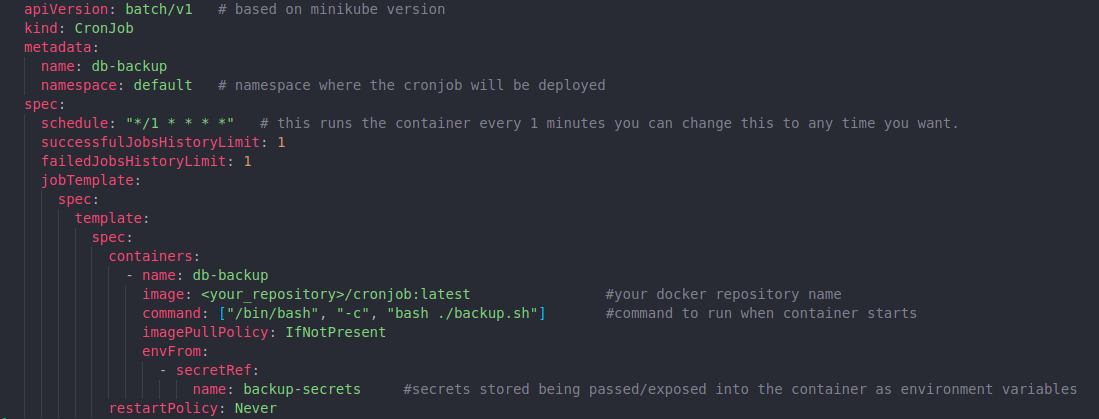
You can see that we referenced a secret name on the second to the last line of the yaml file. This is where we will pass the variables to the container.
So now to use the kubectl command we need to start minikube using the below command.
minikube start
After successfully starting you will see below.
Done! kubectl is now configured to use "minikube"
cluster and "default" namespace by default.
Now we will create the secret inside our Kubernetes cluster, and we will run the following:
kubectl create secret generic secret-name --from-env-file=path-to-env-file
This secret will be loaded from the env file and available to the container from the cluster.
After creating the secret, we will then deploy the cronjob file into our Kubernetes cluster by running the following:
kubectl apply -f cronjob.yaml
After running the above command you will see the below.
cronjob.batch/db-backup created
After doing all the above steps now when you run the command.
kubectl get cronjobYou should see your Kubernetes CronJob scheduled.
When it runs after 1 minute, you should see a gzip backup of your MongoDB on your S3 bucket.