How to build an Einstein Bot?
In this demo project, we have built an interactive bot in a Trailhead Playground Here we will:
- Prepare our Experience Cloud site and run Chat to enable Einstein Bots.
- Set up an Einstein Bot.
- Add prebuilt dialogs and customize the options menu.
- Create dialogs, a submenu, and a dialog group.
- Write bot conversations using variables and entities.
To set up Einstein Bots for your production org, we need:
- A Service Cloud license
- A Chat license
- Lightning Experience
Step 1: First create an Experience Builder website to test our Live Web Chat and Einstein Bot. We can simply copy and paste the script provided by Salesforce in the Embedded Service Deployment Settings to use the live chat on our external website.
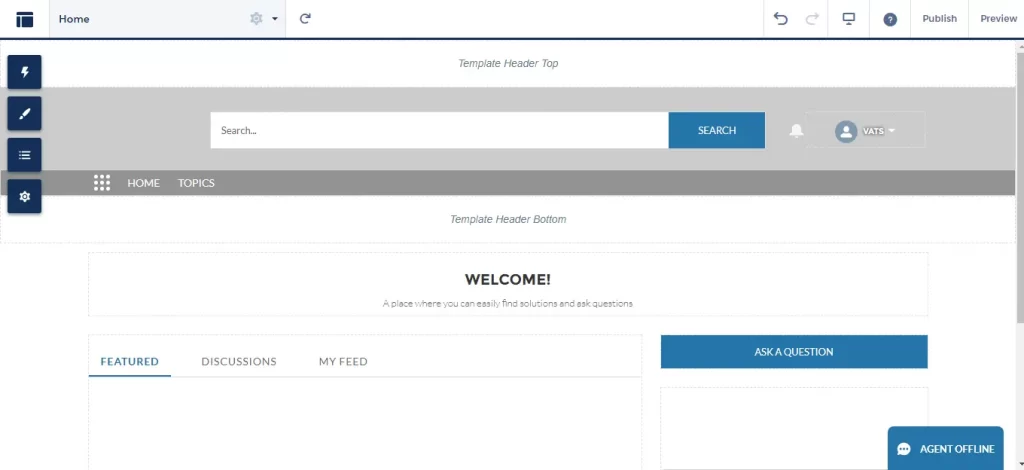
Step 2 : Enable Chat
- Click Bot setup icon in the top left.
- Select Salesforce Setup.
- You should be returned to the All Sites page in the Service Setup. If not, enter Settings in the Quick Find box, then select Settings.
- Copy the URL associated with the site.
- Click Service Setup to go to Service Setup Home. Service Setup in the Setup gear dropdown.
- Click View All and then search for and select Chat with Customers. Recommended Setup in Service Setup Home
- Click Start. For Queue Name, enter FAQs.
- For Name This Agent Group, enter Chat Agents.
- Click the plus sign next to your name, and click Next.
- Keep your agents’ chat workload as is, and click Next.
- For Website URL, paste the URL you copied from your site and Click Next.
- Click the Service tile, then Next.
- Keep Offline Support off, and click Next.
- You do not need to copy and paste the Chat code snippet. Your Trailhead Playground already has the Embedded Service Chat code to power chats with your customers on your sites or websites. Click Next, then Done.
Step 3 : Add the Chat widget URL to your site’s security settings to allow live web chat.
- From Setup, enter Chat in the Quick Find box, then select Chat Settings.
- Copy the URL in Chat API Endpoint. The Chat API Endpoint field on the Chat Settings page.
- From Setup, enter Sites in the Quick Find box, then select All Sites.
- Click Builder next to your site.
- Click the Settings icon Settings icon in the upper left.
- Click Security.
- Change the default Content Security Policy (CSP) from Strict CSP: Block Inline Scripts and Script Access to All Third-party Hosts (Recommended) to Relaxed CSP: Permit Access to Inline Scripts and Allowed Hosts.
- Click Allow in the popup window.
- In the Trusted Sites for Scripts below the CSP section, click + Add Trusted Site.
- For the Name, enter Chat.
- For the URL, enter the URL you copied from Chat API Endpoint in Chat Settings.
- Make sure Active is checked.
- Click Add Site
Step 4: Add Embedded Service Chat to Your Site
Now let’s add Embedded Service Chat to your website so customers can quickly get answers to their questions by chatting with an agent in the browser.
- From Setup, enter All Sites in the Quick Find box, then select All Sites.
- Next to your site, click Builder.
- Click the Components icon Lightning bolt icon in the top-left corner to open Components and scroll to the Support section.
- Drag the Embedded Service Chat to the template footer. Scroll down the web page to see the template footer at the bottom of the page. Placing Embedded Service Chat in the template footer allows it to appear on all web pages. Snap-ins Chat component added to the template footer.
- Click Publish.
Step 5: With your bot requirements met, you are ready to enable Einstein Bots.
- Within Experience Builder, click the Menu icon and select Salesforce Setup. Salesforce Setup is highlighted from the Menu icon drop-down.
- From Setup, enter Einstein Bots in the Quick Find box, then select Einstein Bots.
- In the Settings area:
- Click the toggle next to Einstein Bots to turn it On.
- Review terms, and click the I’m authorized by my company to accept these terms checkbox to accept them.
- Click Try Einstein.
- To provide your customers with a menu of options for interacting with your Einstein Bot, click the Drop-down icon next to the Bot Options Menu and select Edit.
- Select the Enable Einstein Bots Options Menu checkbox and click Save.
Step 6: Create a New Einstein Bot
- From Setup, enter Einstein Bots in the Quick Find box, then select Einstein Bots.
- Click New.
- The first screen asks you to select the type of bot to build. Select Start from Scratch and click Next.

- A setup wizard walks you through a few screens to gather basic information about the bot, including:
- Bot Name
- Greeting
- Main Menu Options
- Let’s name our Einstein Bot Jana and select the bot’s default language.

- Click Next.
- Enter a greeting message that identifies your bot by name and makes it clear that it’s not a human.
For example: Hi, I’m ‘Jana’, a digital assistant. How can I help you?

- Set up a menu for your customers with common issues or questions you want your bot to handle. Let’s enter Order Related in Menu Item 1 for any questions related to a customer’s order. Let’s add Appointment Related in Menu Item 2 for any questions related to scheduling.
- Click Next.
- The bot wizard asks to link to an existing deployment. We’ll be handling this later, so click Next.

- Click Proceed to build your bot.
- Click Finish.
- Our bot now has a name, a greeting, and a menu.

-
Step 7: The Bot Builder
Now that you’ve built your bot, let’s check out the Einstein Bot Builder overview page. It includes the bot’s name and description, a place to train your bot to recognize what customers want, and settings that let you customize the bot response delay time. Let’s take a minute to get acquainted with this page.
Click the Bots dropdown arrow icon. and select the Overview page.

-
To store chat transcripts (including customer data) in the conversation log, click the pencil icon next to Log Conversations. Select Store Einstein Bots conversation data, and click the check mark to save.
In this project, we work within the Dialogs, Entities, and Variables tabs.

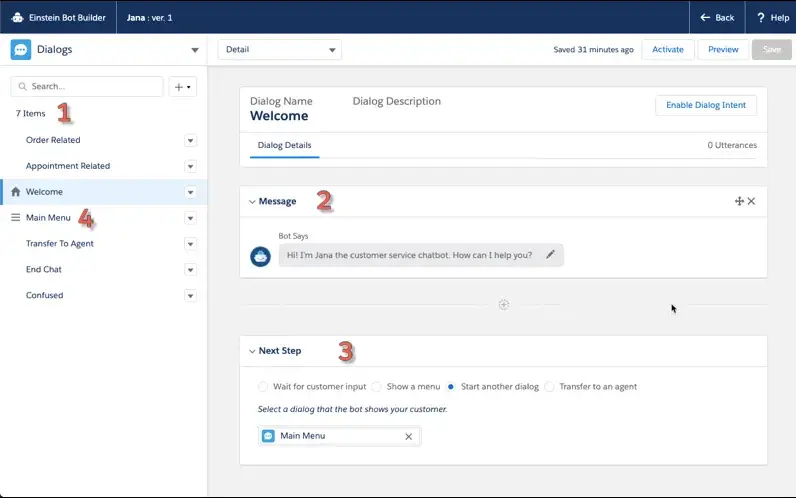
This is the Dialog page. Dialogs are conversation snippets that control what a bot can do.
Click Welcome on the left side menu. These are the prebuilt dialogs (1). Notice that Welcome is set as the “Home” dialog. This indicates where the bot always starts. “Confused” is a fallback mechanism for when a bot cannot identify what a customer would like to do (also known as intent).
You see that the bot wizard set up our welcome Message (2) and created the Next Step (3) flow to our Main Menu. This section is where we indicate the next step after this dialog. You can set it to Show a menu, Start another dialog, Transfer to an agent, or Wait for customer input, which implies you will use NLP to identify customer intent and start the next dialog.
After the Welcome dialog, the bot immediately goes to the Main Menu dialog (4).
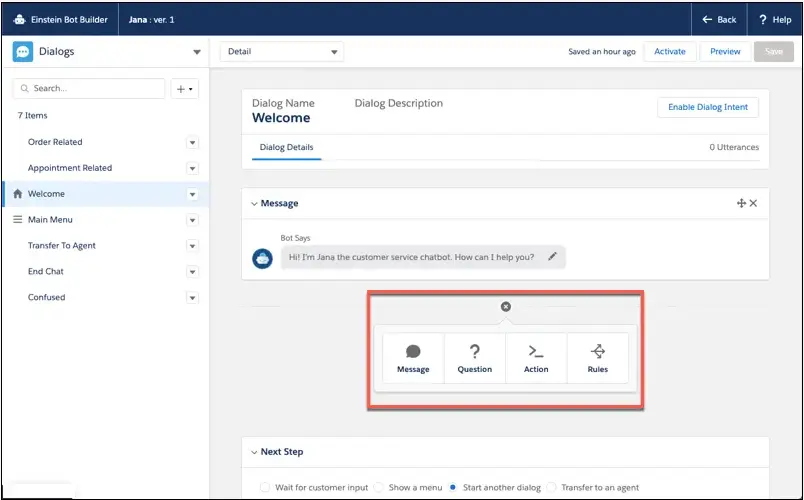
Click the Plus icon between the Message and Next Step sections, and you can see that dialog steps are built from:
Messages—communicate information to the customer using text.
Questions—ask for customer input and store that information.
Actions—access Salesforce automation tools such as Apex code, Flows, outbound email, or Object Search.
Rules—add conditional logic based on customer data and perform actions such as transfers, setting variables, or ending the chat.
Step 8 : Add Prebuilt Dialogs to the Main Menu
For the rest of this project, we use the Einstein Bot Builder to set up dialogs, variables, and entities. These are the elements that manage the interaction between your customers and the bot.
Now, let’s update our main menu by adding End Chat and Transfer to Agent.
Click Main Menu. This is the Main Menu dialog. It consists of the menu options we specified in setup: Order Related and Appointment Related.
Ensure Show a menu is selected.
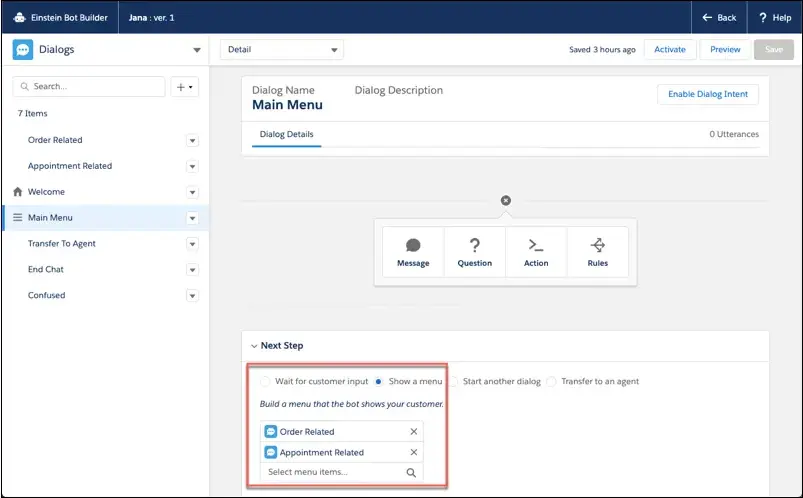
Click in the Select menu items search field.
Select Transfer to Agent.
Click in the field again and select End Chat.
Click Save, which is at the top right of the page.
Step 8 : Configure the Chat Button to Preview the Bot
Before we continue, we need to point our chat button to the bot we created. If we don’t complete this step, we cannot preview the bot.
- Click Overview from the dropdown menu. Overview highlighted in the Bot Builder dropdown.
- In the Channels section, click Add.
- In the Add Channel window, select Chat from the Select an Option dropdown menu.
- Enter Chat Agents in the Deployment search box and select Chat Agents.
- Leave Require Agent Online unchecked. The Add Channel dialog with Chat selected as a channel.
- Click Save.
- We have now mapped our bot to our chat button. Let’s preview our bot.
Step 9 : Test your Bot
- You need to activate the bot before you can preview it.
- From the Overview dropdown, navigate to the Dialogs page.
- Click Activate.
- Click Preview.
- Next to Chat Agents, click Submit.
- You should see your Embedded Service Chat appear. If you see the Agent Offline status, try again and wait. This could take a minute. Click Chat with an Expert to preview the bot.
- Note : Alternatively, you can preview the bot from the Chat widget on your Experience Cloud site. From Setup, enter Digital Experiences in the Quick Find box, and click All Sites. Select Builder next to your site. Then, click Preview in Experience Builder.
- Enter your first and last name, email address, and subject into the Chat form.
- Click Start Chatting.
You should be greeted by the bot, which looks like this.
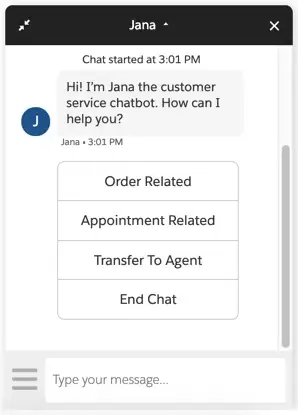
You should see the welcome message and the main menu we set up.
Step 10 : Customize the Options Menu
You can pin popular dialogs in the Bot Options Menu for your customers. Let’s add the Main Menu and Transfer to Agent so that customers can easily return to their main menu or request agent assistance at any time.
- Click Deactivate. Before editing the bot, you must deactivate it.
- Click Yes to agree to deactivate it. When you do this your customers see a message that agents are not available.
- Click the dropdown arrow next to the Main Menu dialog and select Edit.
- Check Show in Bot Options Menu. This is the setting that gives customers a quick way to leave a dialog during the chat.
- Click Save.
- Repeat for the Transfer to Agent dialog.
- Activate the bot.
- Next to Chat Agents, click Submit.
- Click Chat with an Expert.
- Fill in every field in the pre-chat form and Start Chatting.
- Click The three lines icon. and you should now see the Transfer to Agent and Main
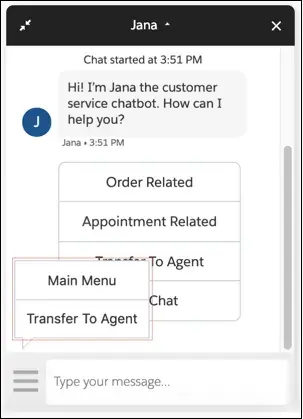
Try it. Click The three lines icon. and then click Main Menu. Did you see that the bot displays the main menu again? If not, click the 1 new message link. This is useful for customers in a very long chat who want a quick way to get back to the main menu.
Step 11 : Add a New Dialog to the Main Menu
Earlier we added prebuilt dialogs to the main menu. Let’s now add a new dialog.
- On the Dialogs page, click Deactivate.
- Click Yes.
- Click the plus sign and select New Dialog. Einstein Bot Builder with New Dialog option highlighted from the Plus drop-down.
- For Name, enter Search FAQ.
- For API Name, enter Search_FAQ.
- Leave Dialog Description blank.
- The Assign to Dialog Group setting lets admins group similar dialogs together in the Bot Builder for easy navigation. For now, leave it set to none.
- Select Show in Bot Options Menu.
- Click Save.
- Click Main Menu.
- In the Next Step section, ensure Show a menu is selected.
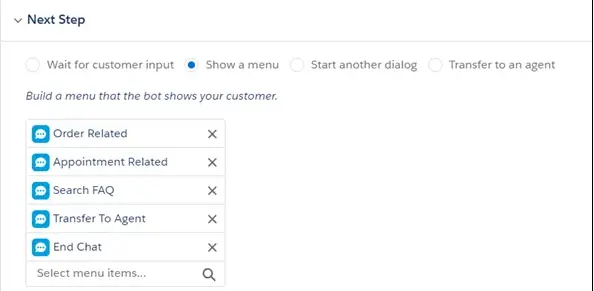
- Click in Select menu items and click Search FAQ.
- To rearrange menu items, simply click and drag them to the desired position. Click and drag Search FAQ, moving it under Appointment Related.
- Click Save.
Your new menu should look like this.
Step 12 : Create a Submenu
When a bot has more than five to six menu options (supported inquiries types), group them in different categories and use submenus to add more options without taking up screen space. This gives customers a cleaner and more efficient navigation experience. Customers viewing menu options from their phones will appreciate it!
Similar to the Main Menu options, each submenu option maps to a dialog. Let’s create a submenu for Order Related with these new transaction dialogs
- Order Status
- Cancel an Order
- Return an Order
So far we’ve created empty dialog placeholders, and we’ll add the conversations later. For now, let’s add the new transaction dialogs.
Click the plus sign and select New Dialog and enter the details:
- Name: Order Status
- API Name: Order_Status
- Leave Show in Bot Options Menu unchecked.
- Click Save.
- Repeat this process for Cancel an Order and Return an Order.
Add the new dialogs to the Order Related menu.
- Click the Order Related dialog (in the left panel) and select Show a menu from the Next Step section.
- Add the menu items we just created. Type and then select Order Status, Cancel an Order, and Return an Order.
Click Save.
We now have a menu called Order Related that houses three dialog placeholders.

Here is our new menu navigation. The bot presents the customer with the welcome message and provides a list of choices (main menu). The customer selects Order Related, and the bot provides three options (submenu).

Step 13 : Write Bot Conversations Using Variables and Entities
Create an Entity for Order Number
Entities are a type of data that you want to collect from a customer. For example, an entity can be an order number or email address.
- Let’s assume all orders in our company’s management system are in the format 00000100.
- Next to Dialogs, click the dropdown arrow and select Entities.
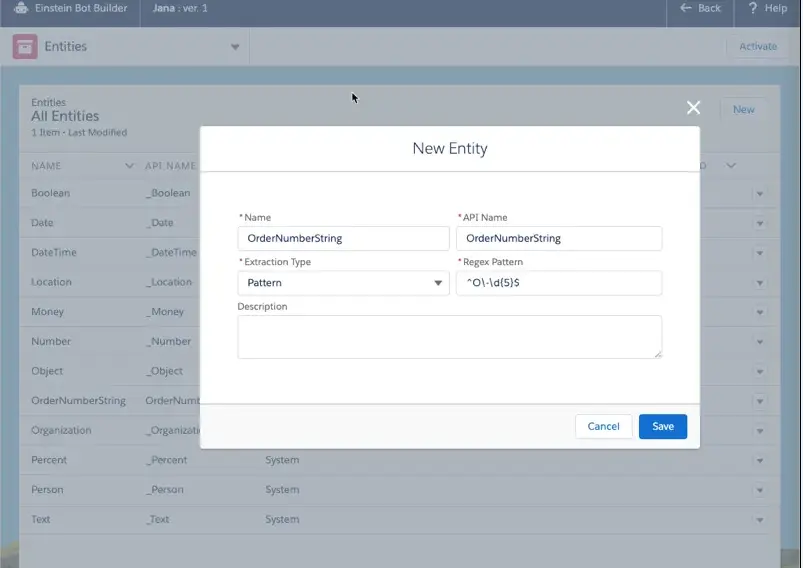
- Click New, and enter the details:
- Label: OrderNumberString
- Extraction Type: Pattern
- Regex: ^d{8}$ (We use regex, a regular text expression that describes a search pattern, to ensure Salesforce stores order numbers in the proper format. The expression ^d{8}$ only allows strings with 8 numbers to be stored in any variable associated with this entity.)
Add a Question and Create a Variable
A variable is a container that stores a specific piece of data collected from the customer. Let’s create the variable OrderNumber and associate it with the entity OrderNumberString as we add a question to the Bot Asks field.
- Next to Entities, click the dropdown arrow and select Dialogs.
- Click the Order Status dialog and select Question in the main body of the dialog.
- In Bot Asks, enter “What’s the order number? (Note: It is usually 8 numbers.)”
- Set the Entity Name to attribute to the OrderNumberString (Text).
- Click in the Save Answer to Variable box, and Select + New Variable.
- Name: OrderNumber
- API Name: OrderNumber
- Data Type: Text
- Click Save.

To verify we are capturing the customer entry, add a message. This way the variable gets merged back to a message so that we can verify the result.
- Click the Plus icon below the Question section and select Message.
- In Bot Says, enter: Sure, let me look up this order {!OrderNumber} for you.
Add an action and find the required information using Flows or Invocable Apex. Here we have used an inbuilt Flow to search the order object.

Your conversation should look like this.

The Jana bot showing order status of 00000100.
Handle invalid input using Conversation Repair and Rules
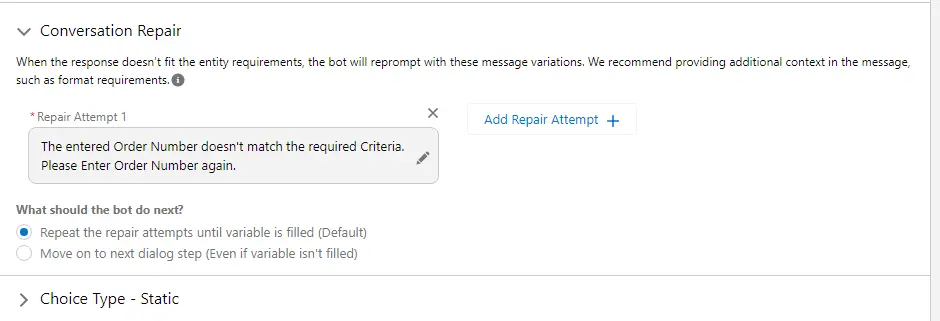
If the user input doesn’t match the defined Regex, then a conversation repair attempt can be made until the user inputs the correct order number.
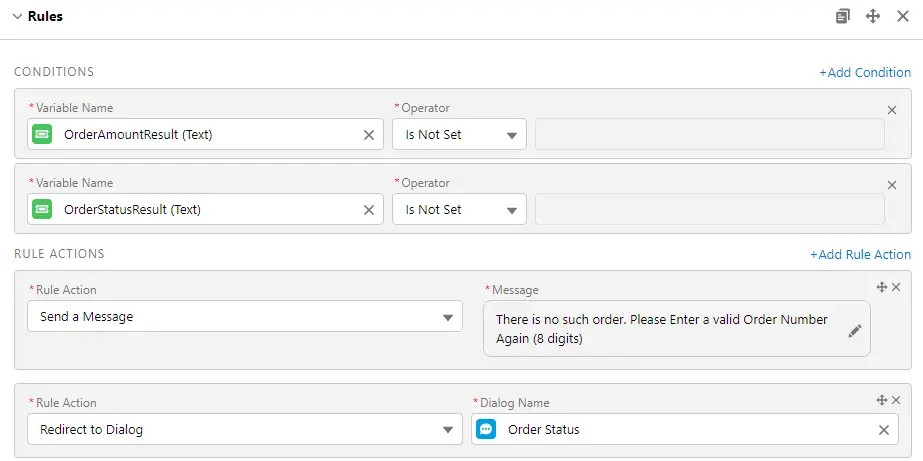
This rule defines the condition when the entered Order number doesn’t match any existing order. It will simply redirect the user to the Order Status dialog flow again.
“Congratulations, you just had a conversation with a bot! More importantly, you just built a bot that can engage with your company’s customers.”
Step 14: Train Your Bot To Understand Customer Intent
Since bots can handle a multitude of scenarios, you can train your bot to understand the ways your customer might ask about something. You can do this by uploading or creating datasets for your bots to train from.
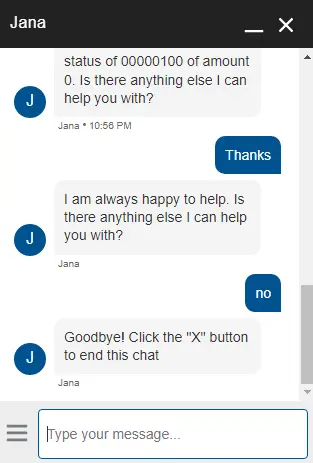
We have done this by using intents to understand natural language.
What is Intent in Einstein Bot?
Intent is defined as the intention of a user to write a message. We can have multiple utterances/sentences for one intent.
- Ex: How are you?
- For how are you, the intention we have the following utterances:
- How are you?
- How do you do?
We can use Intents in 2 ways:
1. Within Einstein Bot, by Enabling Intents for specific Dialogs.
2. By creating Einstein Intent Sets.
- After clicking on your Bot, You’ll go to Einstein Bot Builder.
- Now, Click on any Dialog from the left side.
- Click on the “Enable Dialog Intent” button from the right top corner.
- After enabling Dialog Intent, It’ll add a new tab near “Dialog Details” with the name “Dialog Intent”.
- Now we need to add Utterances for this Intent.
- Utterances are the inputs by the user and We want Dialog should be the response for these inputs.
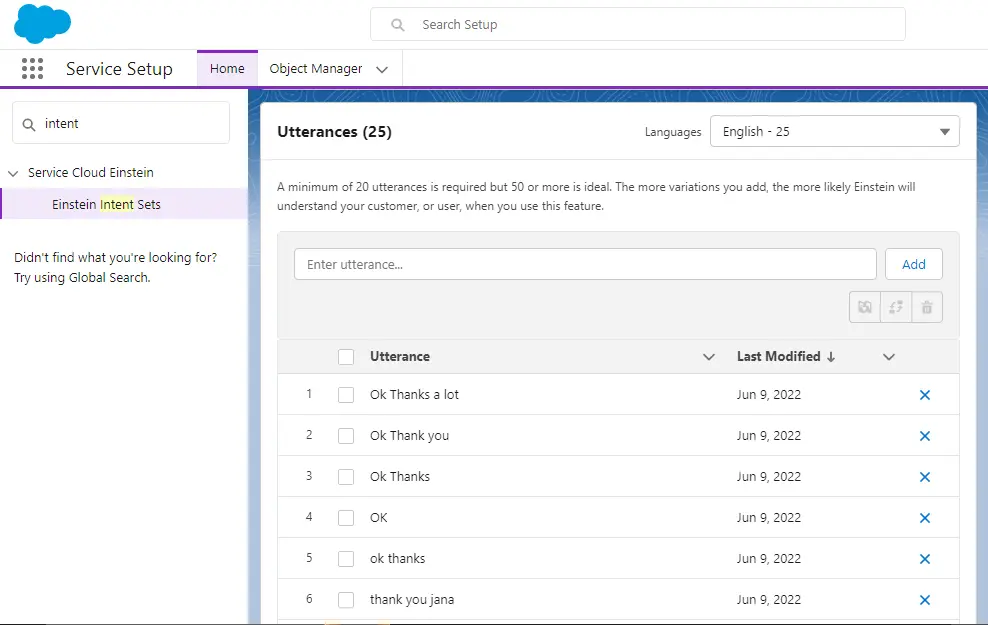
- As you can see, we have added some utterances in the above picture, for all these inputs, Bot will respond, “I am always happy to help. Is there anything else I can help you with?”
- It works on Exact matches. But if we don’t want an exact match, we need to enable Einstein.
- To enable Einstein, We require at least 20 utterances.
- After Updating Dialogs, Intents, and Utterances. Now your Einstein bot can respond to the Utterances.
- Make sure you don’t put the same Utterances for more than 1 dialog.
- Suppose a user enters something out of your Utterances. Update Confused Dialogue, So that the user can type relevant input.
There you have it! A step-by-step comprehensive guide to help you set up Einstein Chatbot in Salesforce and its various features.

