


What is Apigee?
Apigee is a platform for developing and managing APIs. By fronting services with a proxy layer, Apigee provides an abstraction or facade for your backend service APIs and provides security, rate limiting, quotas, analytics, and more.
Apigee Setup
In order to set up a demo Apigee account, we first need a Google Cloud Free Trial Account. Credit Card Information will be required but a free credit of $300 will be provided to set up a test account. Here’s the link:
https://console.cloud.google.com/freetrial/signup/tos
Then, we set up a Google Cloud Project which will be associated with our Apigee Account. The link to set it up:
https://cloud.google.com/resource-manager/docs/creating-managing-projects?hl=en_US
To set up an Apigee demo account, we followed the steps provided in the official documentation by Google. Click on the following link to start setting up your Apigee Account:
https://cloud.google.com/apigee/docs/api-platform/get-started/eval-orgs?hl=en_US
After creating your Apigee account, a Launch button will appear to test a Hello World API through your Apigee Gateway account.

Open the Apigee Console by clicking the button provided. If you have connected a Google Cloud Project with your Apigee eval account, you will see the following screen:

Click on API Proxies. You will see the following screen with no API proxies.
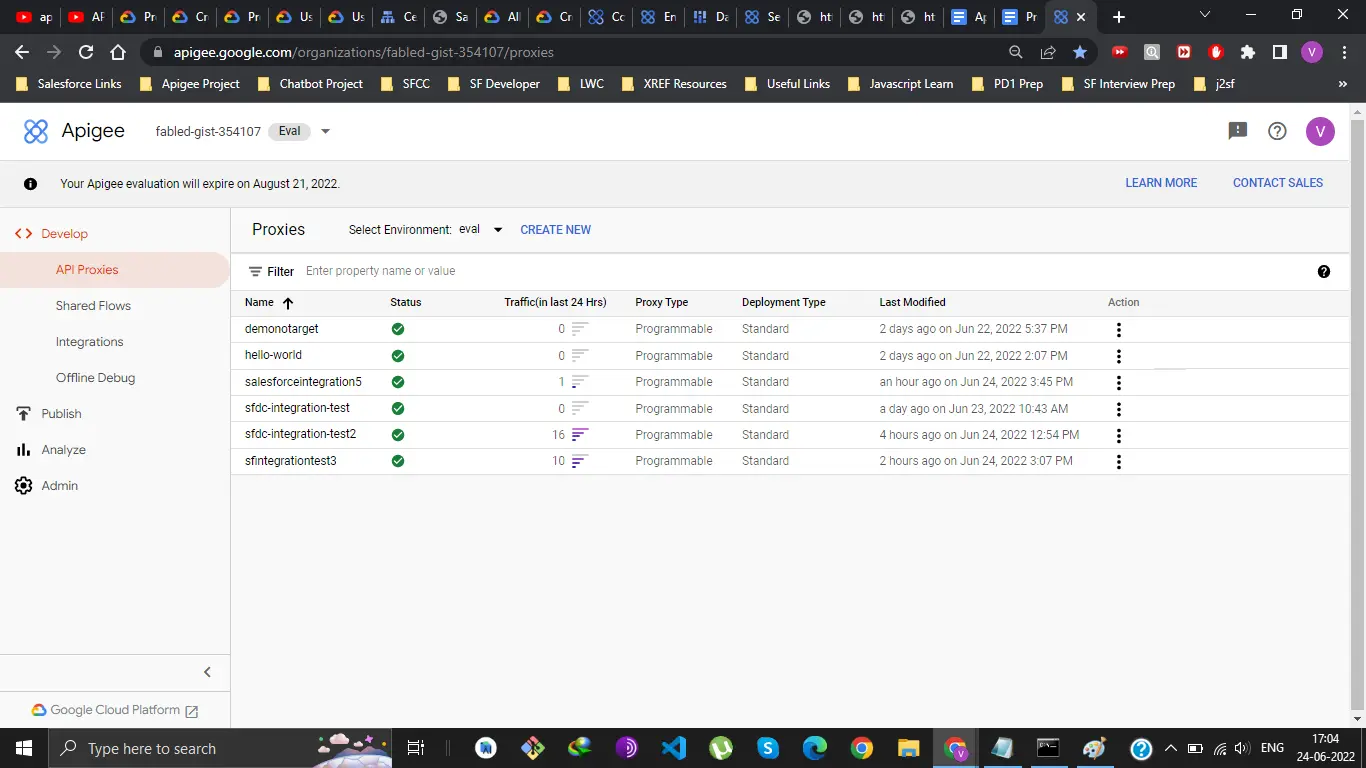
Click Create New.
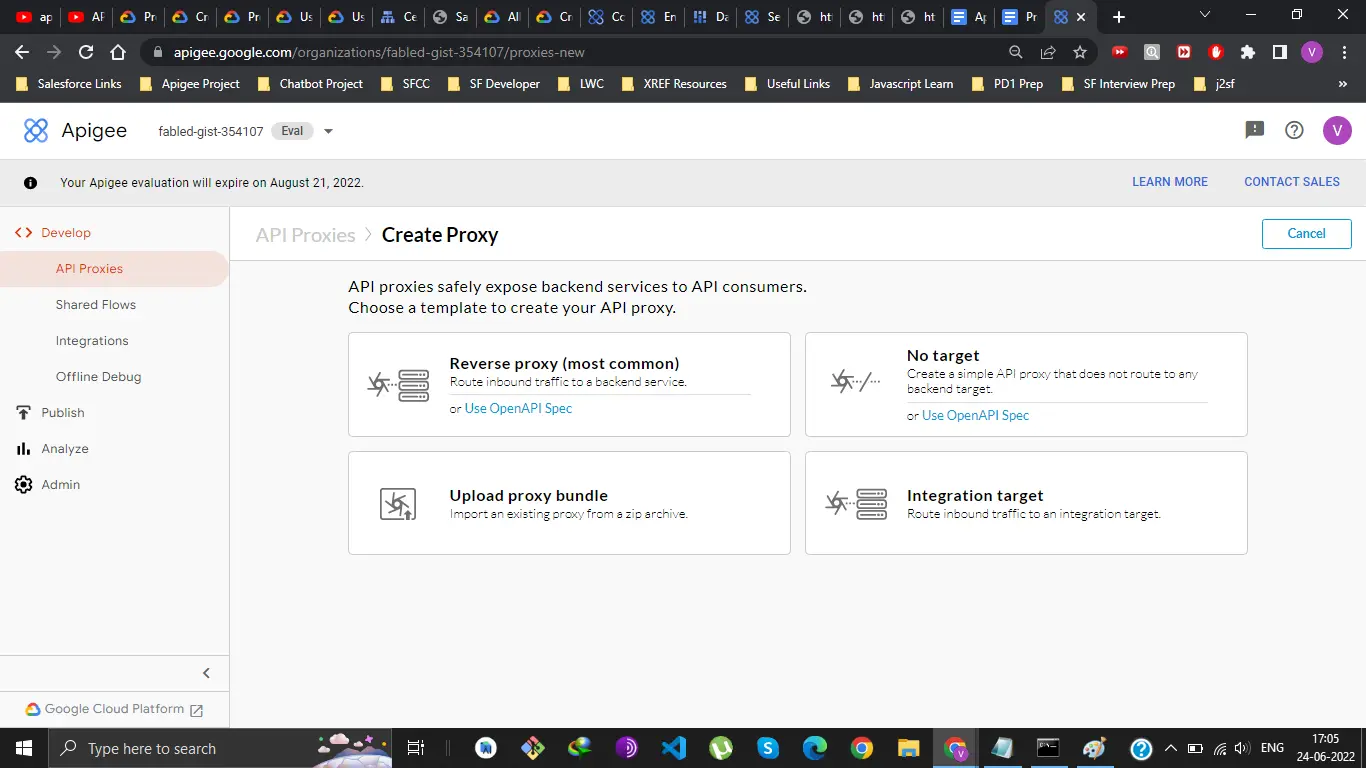
Click Reverse Proxy. We choose this so that we can provide a Salesforce REST API target as a backend API.
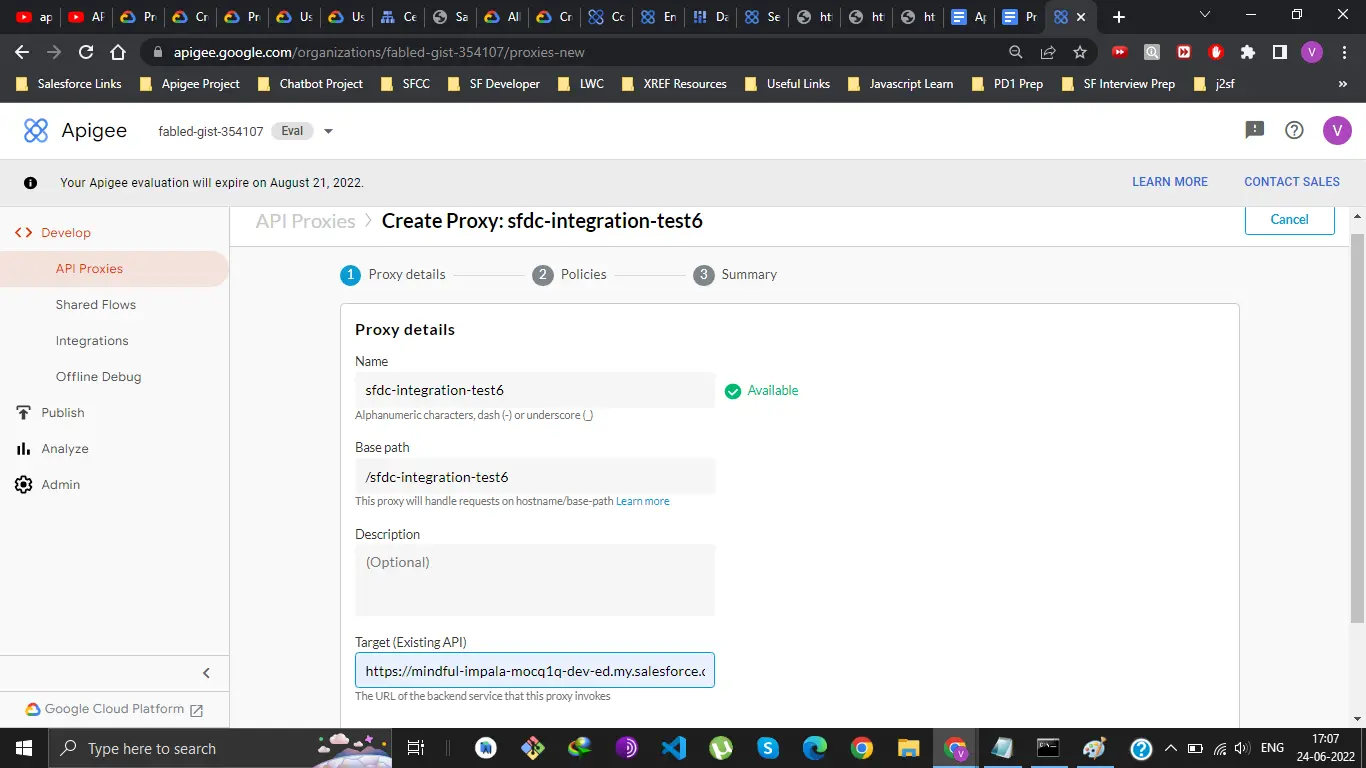
We will create a new Account record named “ApigeeAccount2” in Salesforce using Apigee, so we use a sample REST API Target:
https://mindful-impala-mocq1q-dev-ed.my.salesforce.com/services/data/v53.0/sobjects/account
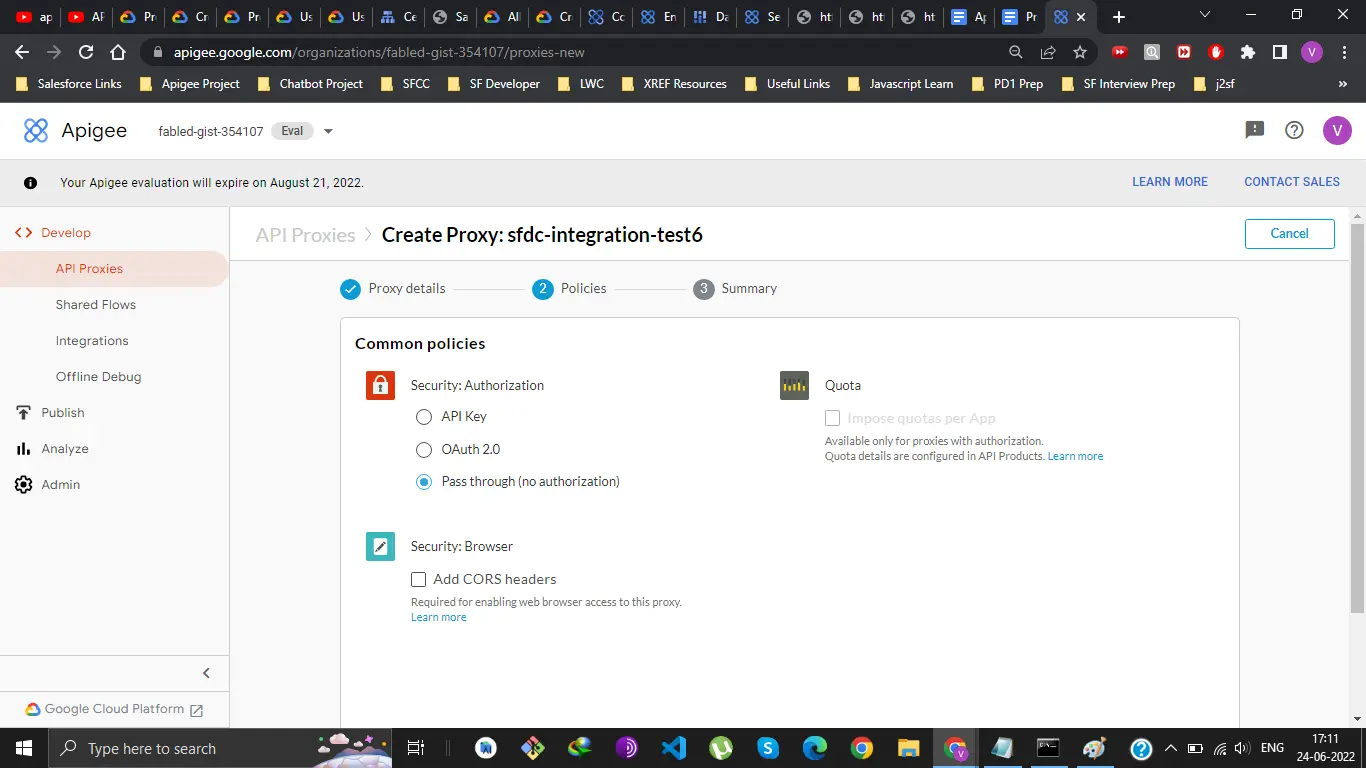
In this screen we can define authorization mechanisms for accessing Apigee, we can also do this afterward. Currently, we chose no authorization.
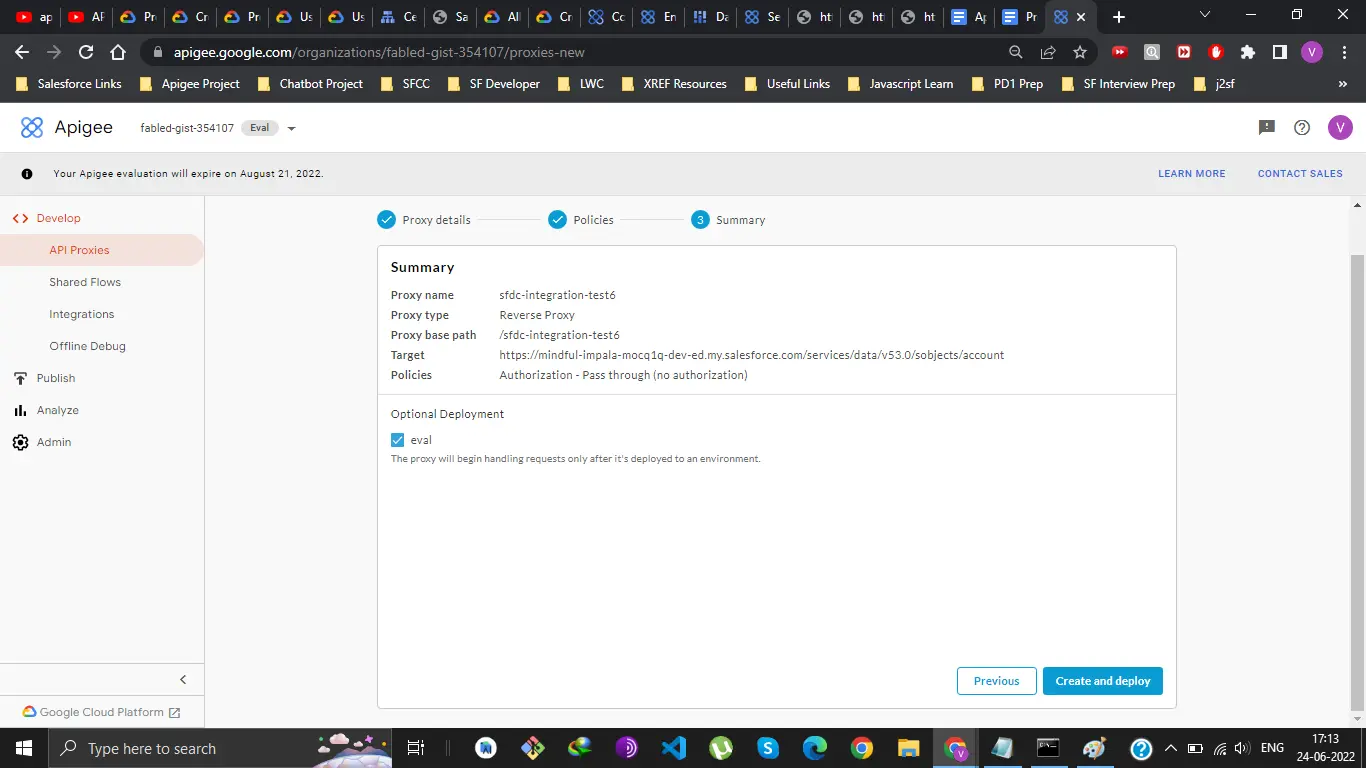
In the summary screen, deploy to your eval so that we can start working on this proxy. Then click Create and Deploy.
After that Click Edit Proxy. You will see your API proxy customization screen.
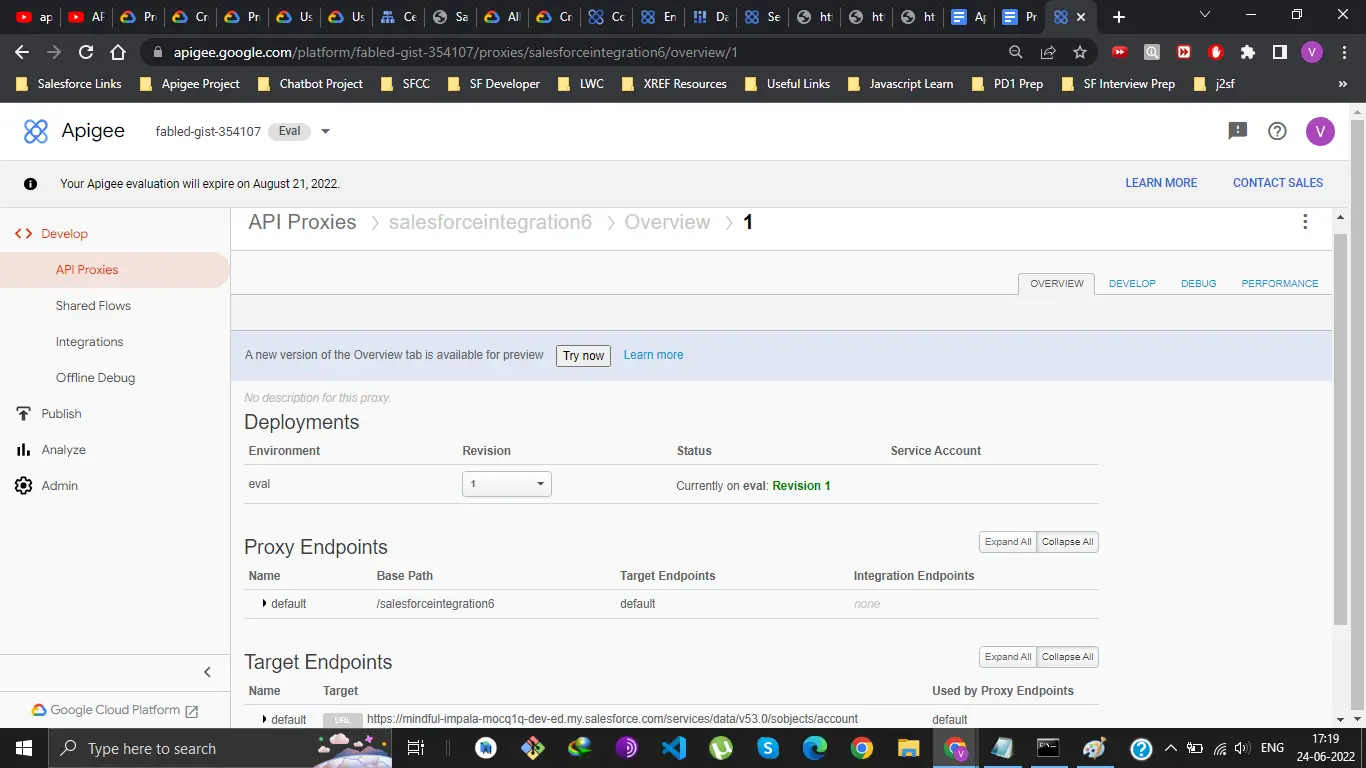
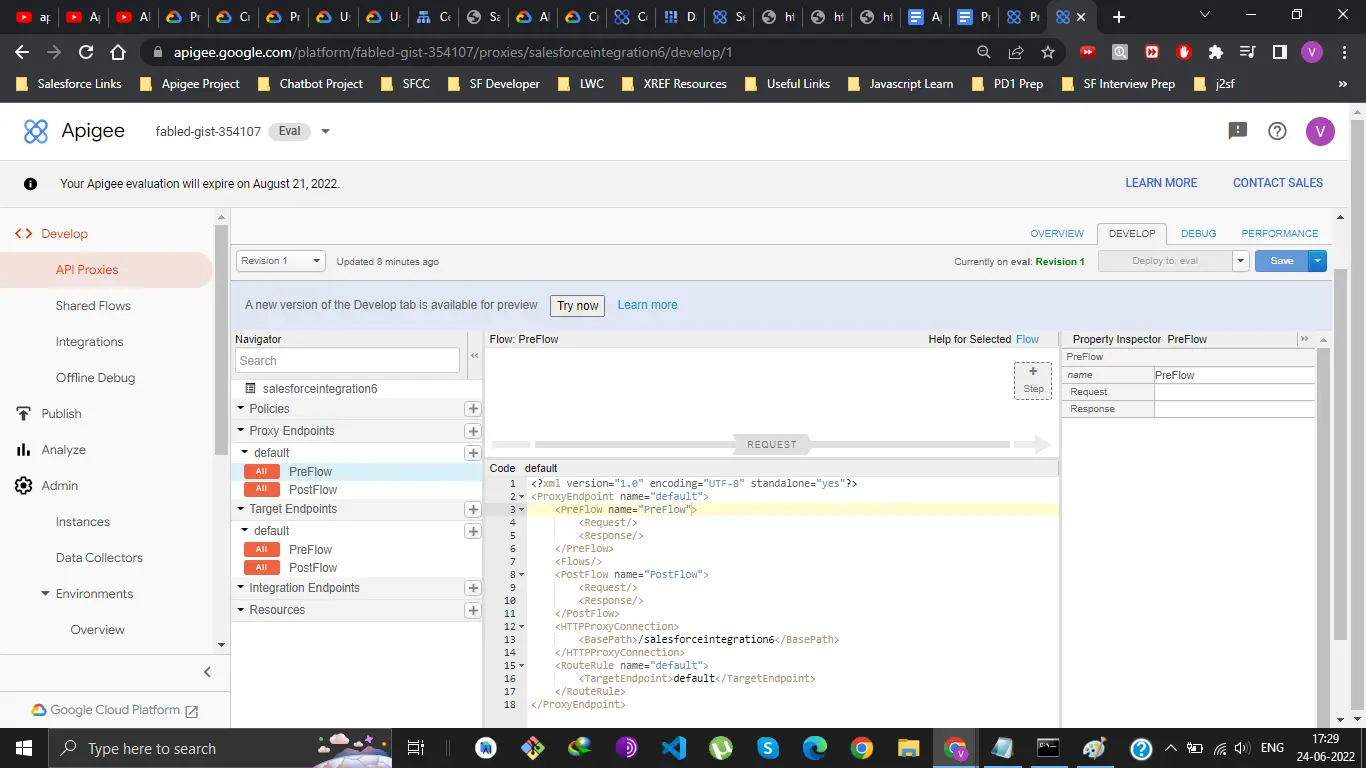
In the above screen we can see our proxy endpoint where we can access this, our target endpoint, that is our Salesforce REST API, our different proxy deployment versions. We go to the Develop tab to program the flow of our proxy.
Our Flow will Follow the Below Diagram
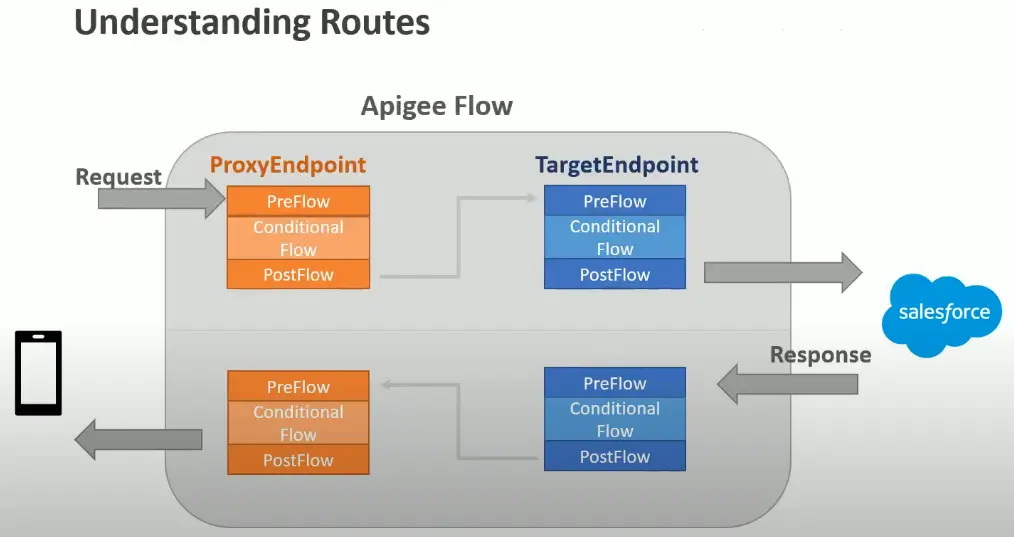
We can define different kinds of policies in our Pre flow and post-flow.
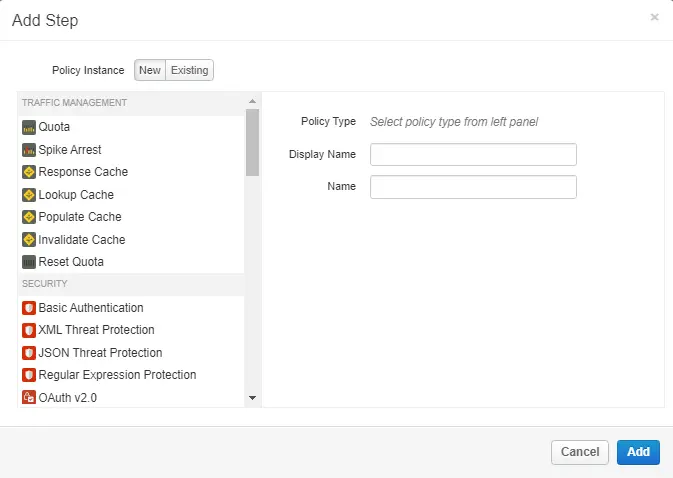
For example:for traffic management, in Quota Policy we can define the number of requests allowed per minute on our API, Spike Arrest Policy refers to a sudden increase in demand at a particular moment of Time. We can also define different security mechanisms.
Sample Code – Quota policy in a reverse proxy in PreFlow, to allow only 3 requests per minute.
<?xml version="1.0" encoding="UTF-8" standalone="yes"?>
<Quota continueOnError="false" enabled="true" name="Quota-1"><DisplayName>Quota-1</DisplayName><Properties/>
<Allow count="3" countRef="request.header.allowed_quota"/>
<Interval ref="request.header.quota_count">1</Interval>
<TimeUnit ref="request.header.quota_timeout">minute</TimeUnit>
</Quota>
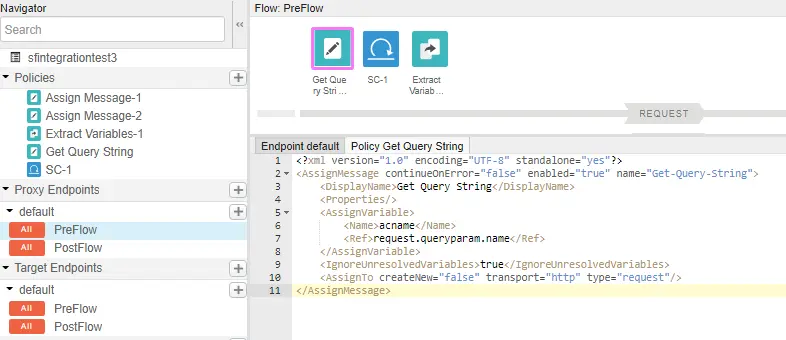
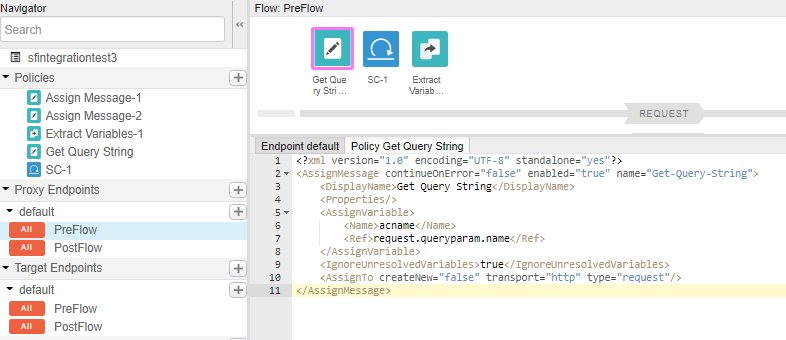
For our demo project, we first define an “Assign Message” policy to get the account name that is to be created from the URL. We named it “Get Query String”.
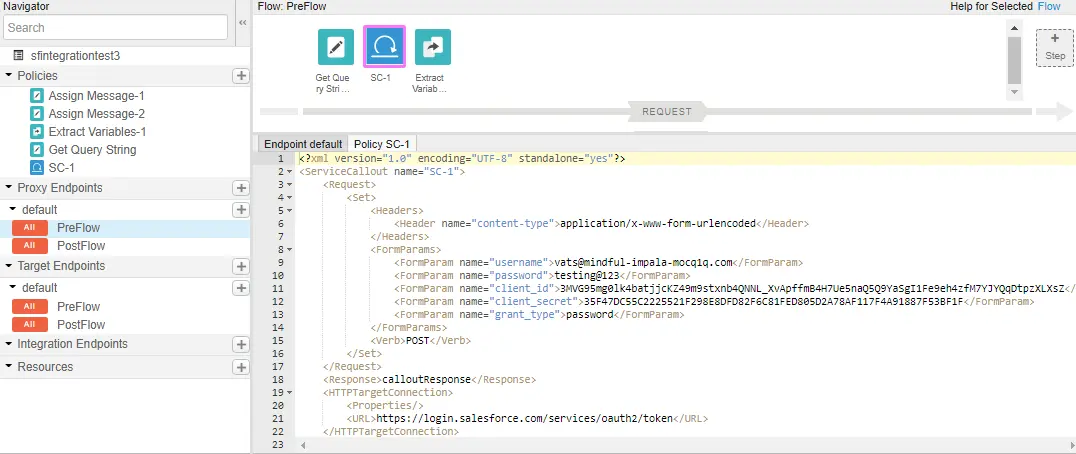
Then we define a “Service Callout” Policy which will call out to salesforce for an access token using the OAuth2.0 mechanism. We will demonstrate how to create a Salesforce Connected app in later steps to get a Consumer key and secret provided here.
Next we define an “Extract Variables” policy to extract the access token and token type and store them in local variables to use later when we send the account details to salesforce.
We go to our default endpoint PreFlow next, to send the access token and token type variables with our account name data as a POST request. We have defined an “Assign Message” policy here.
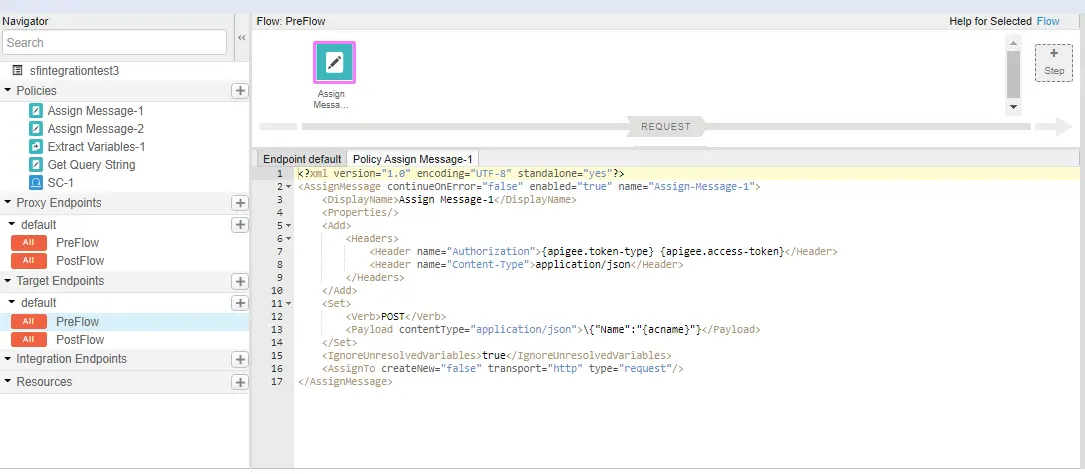
Finally for our development setup, we store the response received from salesforce in a local variable.

Click Save. A new version will be created, after saving click Deploy to deploy the new version.
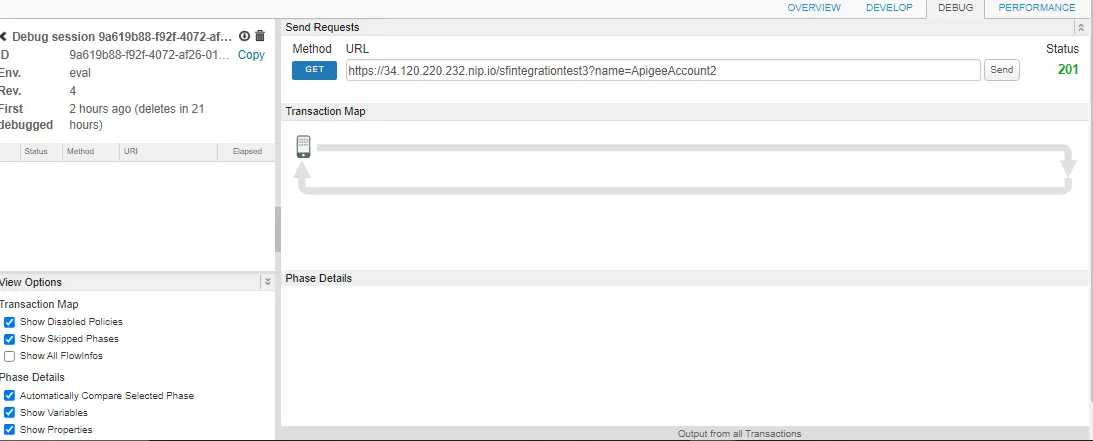
In the Debug tab, we can trace our request-response flow. We pass an account name named “ApigeeAccount2” in the URL and start the debug session then click Send. We will see the status of our request, 201 for success.
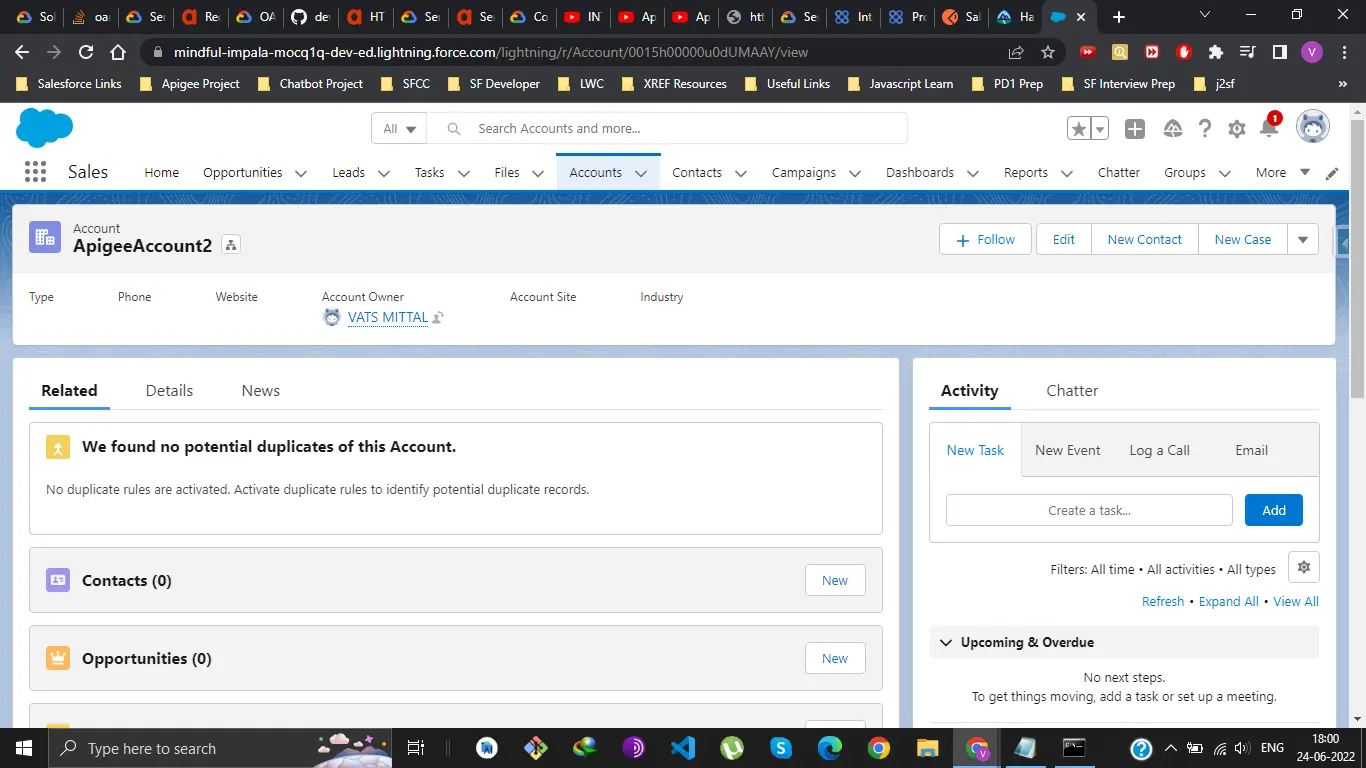
In our Salesforce Org, we check that account named “ApigeeAccount2” is created!
To set up a connected app in Salesforce to provide access to Apigee, a connected app enables external applications to connect to Salesforce using APIs:
Log in to Salesforce.
Click settings > Setup.
From the side navigation, click Apps > App Manager to open the App Manager page.
Click New Connected App.
Under Basic Information, fill in the required fields.
Under API (Enable OAuth Settings), select the Enable OAuth Settings check box.
Although it isn’t used by the connector, enter a Callback URL. You can use http://localhost/ or another placeholder host.
In the Selected OAuth Scopes section, add the following under Selected OAuth Scopes:
- Manage user data via APIs (API)
- Perform requests on your behalf at any time (refresh_token, offline_access)
On the resulting app page, click Manage.
In the Connected App Detail section for the app you just created, click Edit Policies.
Under OAuth policies:
Click the Permitted Users dropdown.
Select Admin-approved users are pre-authorized.
Click Save.
Get the consumer key for the connected app. The connector uses this to authenticate with the app.
On the App Manager page, select your connected app from the dropdown list.
Select View in the list row for your app.
Under API (Enable OAuth Settings), click Manage Consumer Details.
In the Consumer Details panel, locate the Consumer Key, copy the key value, and store it in a safe place for use when configuring the Salesforce connection.
Back on the App Manager page, select Manage in the last row for your app.
In the Profiles section, click Manage Profiles.
Select the check boxes for the user profiles that can use this application. Be sure to select a profile that corresponds to the username used when configuring the connections. In addition, confirm that System Administrator users have access to this application.
Click Save.
You can also follow this Trailhead Trail to learn more about the creation of a connected app:
https://trailhead.salesforce.com/content/learn/projects/build-a-connected-app-for-api-integration
To connect and configure a Salesforce instance to use Change Data Capture (CDC) and Platform Events to stream changes to your Apigee Integration in a pub/sub manner, these links can be followed. These require a self-managed SSL certificate in Apigee which will be uploaded in the Salesforce Connected App setup, which was not feasible for this demo due to the paid resources involved. So here we have provided all the resources for any such requirement.
Configure Salesforce for Apigee Integration:
Getting Started with Apigee Integration and Salesforce:
Create a Salesforce connection:
https://cloud.google.com/apigee/docs/api-platform/connectors/configure-salesforce#user-password
To learn more about policy development in Pre flow and PostFlow, official documentation of Apigee can be referred but requires a trained and experienced professional, to manage and develop a project at the production level at the Apigee end.
A few official resources that we have referred to in this demo:
https://cloud.google.com/apigee/docs/api-platform/reference/policies/service-callout-policy
https://docs.apigee.com/api-platform/security/oauth/access-tokens
YouTube Resources referred to in this demo: